Kenmore sewing machine manuals are essential for understanding machine operation, troubleshooting, and maintenance․ They provide detailed guides for models like 158․13413 and 385, ensuring optimal performance and longevity․
1․1 Understanding the Importance of Manuals
Kenmore sewing machine manuals are crucial for proper operation, troubleshooting, and maintenance․ They provide step-by-step guides for threading, tension adjustments, and resolving common issues like strange noises or mechanical problems․ Manuals also offer maintenance tips, such as cleaning and lubricating older models, ensuring longevity and optimal performance․ Whether you’re working with vintage models like the 158․13413 or newer heavy-duty machines, manuals are indispensable for mastering your sewing machine’s capabilities and keeping it in excellent condition․
1․2 Overview of Kenmore Sewing Machines
Kenmore sewing machines are renowned for their durability and versatility, catering to both beginners and experienced sewists․ Models like the 385 and 158․13413 are popular for their robust construction and wide range of stitching options․ These machines are ideal for various sewing tasks, including free motion quilting and heavy-duty projects․ Vintage Kenmore models are particularly prized by collectors and enthusiasts, offering reliable performance that stands the test of time with proper care and maintenance․
Where to Find Free Kenmore Sewing Machine Manuals
Kenmore sewing machine manuals can be found for free on Sears Parts Direct, third-party websites, and vintage sewing communities․ These resources provide easy access to download PDF manuals for various Kenmore models, ensuring you can operate and maintain your machine effectively․
2․1 Official Sears Website and Resources
The official Sears Parts Direct website offers free PDF manuals for Kenmore sewing machines, including models like 158․13413 and 385․ These resources provide detailed guides for operation, troubleshooting, and maintenance․ Users can easily download manuals, ensuring they have all the necessary information to keep their machines in optimal condition․ Sears’ official resources are reliable and accessible, making it a top choice for Kenmore sewing machine owners seeking free manuals․
2․2 Third-Party Websites Offering Free Downloads
Beyond Sears, third-party sites like ManualsLib and ManualsOnline offer free Kenmore sewing machine manuals․ These platforms host a wide range of models, including vintage ones․ Users can search by model numbers, such as 158․13413 or 385, and download PDFs instantly․ While some sites may require registration, they remain valuable resources for those seeking free access to Kenmore sewing machine manuals without visiting the official Sears website․
2․3 Vintage Sewing Machine Communities and Forums
Vintage sewing machine communities and forums are invaluable resources for finding free Kenmore manuals․ Enthusiasts often share scanned copies of rare manuals, including for models like the 158․13413․ Websites like Yahoo groups dedicated to vintage sewing machines offer a wealth of knowledge and downloads․ These forums also provide tips and advice from experienced users, making them a great place to connect and access hard-to-find documentation for your Kenmore sewing machine․
2․4 Manuals Archive Websites
Manuals archive websites are excellent sources for free Kenmore sewing machine manuals․ These platforms specialize in hosting PDF versions of operation guides, including models like the Kenmore 385․ Sears Parts Direct offers free downloads, while other sites like ManualsLib and ManualsOnline provide extensive libraries․ Users can search by model number, ensuring they find the exact manual needed for their machine․ These archives are a convenient solution for accessing vintage and modern Kenmore sewing machine documentation․

How to Download Kenmore Sewing Machine Manuals
Visit the official Sears website or third-party sources like ManualsLib․ Enter your Kenmore model number to find the manual․ Download and save it as a PDF for easy access․
3․1 Step-by-Step Guide toDownloading Manuals
3․1 Step-by-Step Guide to Downloading Manuals
To download Kenmore sewing machine manuals, visit the official Sears PartsDirect website or third-party sites like ManualsLib․ Enter your machine’s model number in the search bar․ Select the correct manual from the results․ Click the download button to save the PDF․ Ensure your device has enough storage and a PDF reader installed․ Print the manual if needed for easy reference while using your sewing machine․
3․2 Tips for Finding Specific Model Numbers
Locate the model number on your Kenmore sewing machine, usually found on the base, near the bobbin area, or on the motor․ Check the machine’s serial plate or the original packaging․ If unavailable, search online marketplaces or forums for similar models․ Use the Sears PartsDirect website to cross-reference numbers․ Ensure accuracy by comparing multiple sources to avoid confusion․ Verifying the model number is crucial for downloading the correct manual․
Troubleshooting Common Issues with Kenmore Sewing Machines
Address issues like strange noises, thread jams, or uneven stitching by consulting manuals․ Regular maintenance, proper threading, and tension adjustments often resolve common mechanical problems effectively․
4․1 Threading and Bobbin Issues
Threading and bobbin problems are common in Kenmore sewing machines․ Improper threading can cause jams or uneven stitching․ Manuals provide step-by-step guides for correct thread routing and bobbin installation․ Regular cleaning of the bobbin area and ensuring the thread is properly seated can prevent issues․ Always refer to the manual for specific model instructions to avoid further complications and ensure smooth operation․
4․2 Tension Adjustments
Proper tension adjustments are crucial for consistent stitching on Kenmore sewing machines․ Incorrect tension can lead to loose stitches or fabric pulling․ Manuals guide users to adjust upper and bobbin thread tensions using specific dials․ Ensure the thread flows smoothly without tugging․ Testing on scrap fabric helps confirm balanced tension․ Regular checks and adjustments prevent sewing errors and extend machine longevity, ensuring optimal performance for various fabrics and stitches․
4․3 Maintenance and Cleaning Tips
Regular maintenance and cleaning are vital for extending the life of Kenmore sewing machines․ Manuals recommend oiling moving parts, removing lint, and using soft brushes to clean dust․ Avoid harsh chemicals to prevent damage․ Proper storage in a dry environment and regular servicing ensure smooth operation․ Follow manual guidelines for specific cleaning steps tailored to your machine model to maintain optimal performance and prevent mechanical issues over time․
Maintenance and Care for Vintage Kenmore Sewing Machines
Regular cleaning, lubrication, and gentle handling are crucial for preserving vintage Kenmore machines․ Use soft brushes to remove dust and follow manual guidelines for oil application to ensure longevity and functionality․
5․1 Cleaning and Lubricating Older Models
Cleaning and lubricating vintage Kenmore sewing machines is vital for their functionality․ Use a soft brush to remove dust and debris from the exterior and internal mechanisms․ Apply a few drops of sewing machine oil to moving parts, such as the bobbin area and feed dogs․ Avoid harsh chemicals, as they may damage finishes․ Regular maintenance ensures smooth operation and extends the machine’s lifespan, keeping it in excellent working condition for years․
5․2 Restoring Vintage Machines to Working Condition
Restoring vintage Kenmore sewing machines involves thorough cleaning, lubrication, and replacing worn parts․ Downloading the free manual helps identify components needing attention, such as tension discs or presser feet․ Inspect the motor and belts for wear, ensuring they are securely attached․ Lightly sand rusted areas and apply rust-resistant coatings․ Reassemble carefully, testing each function to ensure proper operation․ Patience and attention to detail are key to bringing these classic machines back to life for continued use․
Accessories and Parts for Kenmore Sewing Machines
Kenmore sewing machines often require specific accessories like presser feet and bobbins․ Manuals provide detailed parts lists, ensuring compatibility․ Sears Parts Direct offers genuine replacements and guides for easy identification and ordering, helping users maintain and upgrade their machines effectively․ This ensures optimal performance and extends the machine’s lifespan, catering to both vintage and modern models seamlessly․
6․1 Finding Compatible Presser Feet and Accessories
Finding the right presser feet and accessories for Kenmore sewing machines is crucial for optimal performance․ Manuals often list compatible parts, ensuring proper fitment․ Sears Parts Direct offers genuine accessories, while third-party sellers provide affordable alternatives․ Always verify model numbers to avoid mismatches․ Vintage models may require specific presser feet, which can be found in specialty sewing stores or online marketplaces․ Proper accessories enhance stitching quality and expand creative possibilities for sewists of all skill levels․
6․2 Ordering Replacement Parts
Ordering replacement parts for Kenmore sewing machines can be done through Sears Parts Direct or third-party sellers․ Ensure compatibility by verifying model numbers in the manual․ Vintage models may require rare parts, often found in specialty stores or online marketplaces like eBay or Etsy․ Always check reviews and seller ratings to ensure authenticity and quality․ Proper replacement parts maintain machine performance and extend its lifespan, ensuring consistent stitching and reliability for years to come․
Vintage Kenmore Sewing Machine Models
Vintage Kenmore sewing machines, like the popular Model 158․13413 and Model 385, are known for their durability and timeless design․ These classic models remain sought after by collectors and sewists alike for their reliability and craftsmanship, making them a cherished addition to any sewing collection․
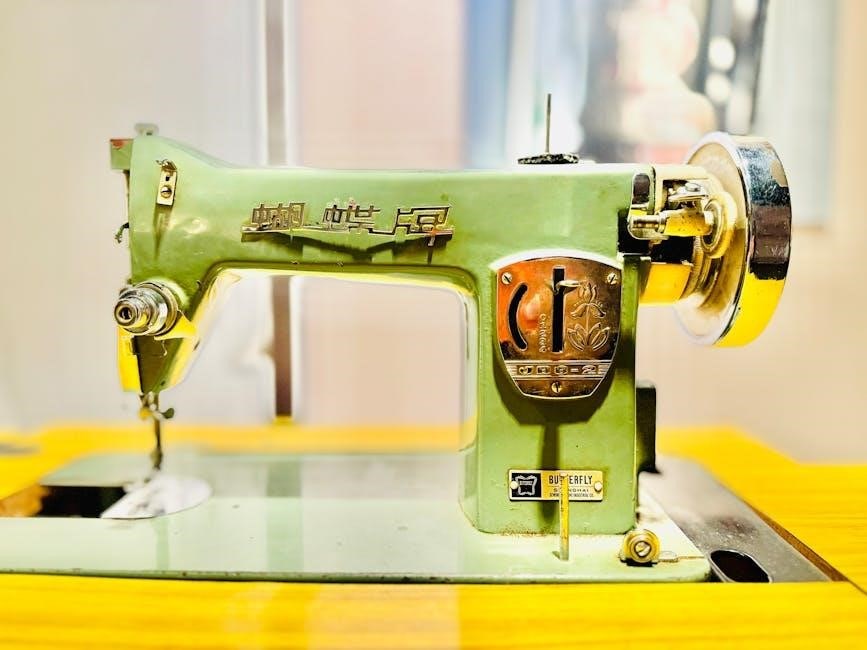
7․1 Model 158․13413 Overview
The Kenmore Model 158․13413 is a highly regarded vintage sewing machine known for its durability and versatility․ Manufactured in Japan, this model offers a range of stitch options and is particularly popular among quilters and home sewists․ Its robust construction and ease of use have made it a favorite for both beginners and experienced crafters․ Manuals for this model are readily available online, ensuring continued functionality and maintenance for years to come․
7․2 Model 385 Specifications
The Kenmore Model 385 is a heavy-duty sewing machine renowned for its robust build and versatility․ It features multiple stitch options, including straight and zigzag stitches, making it ideal for both basic and complex projects․ This model is particularly favored for its durability and ease of use․ Manuals for the Model 385 are widely available online, providing detailed guidance for operation, maintenance, and troubleshooting․ Its capabilities and reliability make it a popular choice among sewists and quilters alike․

Common Issues with Kenmore Sewing Machines
Common issues include strange noises, threading problems, and mechanical faults․ These problems can often be resolved with proper maintenance and reference to the machine’s manual․
8․1 Strange Noises and Their Solutions
Strange noises from Kenmore sewing machines often indicate issues like loose parts, improper threading, or lack of lubrication․ Checking the manual can help identify the source․ Lubricating moving parts or adjusting tension settings usually resolves the problem․ If noises persist, consulting a professional or referring to troubleshooting guides in the manual is recommended for optimal machine performance and longevity․
8․2 Common Mechanical Problems
Common mechanical issues with Kenmore sewing machines include jammed gears, broken belts, or misaligned parts․ Regular lubrication and proper maintenance can prevent these problems․ Consulting the manual helps identify symptoms and solutions․ Replacing worn parts and ensuring correct assembly are key fixes․ Addressing these issues promptly prevents further damage and extends the machine’s lifespan, ensuring smooth operation for years to come․
Upgrading and Modernizing Your Kenmore Sewing Machine
Upgrading your Kenmore sewing machine involves adding modern features like free motion quilting capabilities or advanced stitching options․ This enhances performance and adaptability for contemporary sewing projects․
9․1 Adding New Features
Enhancing your Kenmore sewing machine with new features can significantly improve its functionality․ Adding components like automatic threaders, embroidery hoops, or programmable stitch options allows for more versatile sewing experiences․ These upgrades can be found in modern sewing machine accessories and are often compatible with older Kenmore models․ By incorporating these features, you can expand the creative possibilities of your machine, making it suitable for a wider range of projects․ Proper installation and alignment are crucial to ensure optimal performance․
9․2 Compatibility with Modern Accessories
Modern accessories can breathe new life into your Kenmore sewing machine․ Many contemporary presser feet, embroidery hoops, and digital controllers are designed to be backward compatible, allowing seamless integration․ Adapters and conversion kits enable older models to accommodate newer tools, enhancing functionality․ This compatibility ensures that your machine remains versatile and capable of handling modern sewing demands, from intricate embroidery to heavy-duty projects, without compromising performance or reliability․
Sewing Communities and Forums
Sewing communities and forums offer valuable resources for Kenmore sewing machine users․ These platforms provide tips, manual downloads, and expert advice, fostering connections among sewing enthusiasts worldwide․
10․1 Connecting with Other Sewing Enthusiasts
Sewing communities and forums are vibrant hubs for enthusiasts to share knowledge and resources․ These platforms allow users to connect, exchange tips, and access free Kenmore sewing machine manuals․ Members often discuss troubleshooting, maintenance, and creative projects, fostering a supportive environment․ Such interactions help users optimize their sewing experiences and gain insights from experienced crafters, creating a sense of belonging among Kenmore sewing machine enthusiasts worldwide․ These connections are invaluable for preserving and enhancing sewing traditions․
10․2 Sharing Tips and Manuals
Sewing communities often serve as vibrant hubs for sharing tips, techniques, and manuals․ Members exchange advice on troubleshooting, maintenance, and creative projects, fostering a collaborative environment․ Many forums offer free downloads of Kenmore sewing machine manuals, ensuring access to essential guides․ These platforms also encourage users to share their experiences, helping others optimize their sewing skills and resolve common issues effectively, while preserving valuable resources for future enthusiasts․ This collective sharing enhances the sewing experience for all participants․
Free Motion Quilting with Kenmore Machines
Kenmore machines are well-suited for free motion quilting, offering versatility and precision․ Models like the Singer Heavy Duty enable smooth fabric control, making intricate designs achievable with ease․
11․1 Setting Up Your Machine for Free Motion
Setting up your Kenmore machine for free motion quilting involves a few key steps․ First, attach a darning or free motion foot, which allows smooth fabric movement․ Lower the feed dogs to prevent interference․ Adjust tension settings to ensure even stitching․ Use a sharp, large-eye needle for better thread control․ Finally, practice on scrap fabric to refine your technique and machine settings for optimal results․
11․2 Tips for Successful Free Motion Quilting
For successful free motion quilting, use a darning foot and lower the feed dogs․ Adjust tension settings for consistent stitching and choose a sharp, large-eye needle․ Practice on scrap fabric to refine control․ Maintain steady fabric movement and keep the machine at a moderate speed․ Use a walking foot for straight lines and experiment with thread types for varied effects․ Regularly clean and oil your Kenmore machine to ensure smooth operation during free motion projects․
Heavy-Duty Kenmore Sewing Machines
Heavy-duty Kenmore sewing machines are designed for thick fabrics and heavy-duty projects․ They feature robust construction, powerful motors, and special features like metal frames and high stitch speeds․
12․1 Singer Heavy Duty Models
Singer Heavy Duty models are renowned for their durability and robust performance, often compared to Kenmore machines․ These models feature metal frames, powerful motors, and high stitch speeds, making them ideal for thick fabrics and heavy-duty projects․ They are popular among sewists for their reliability and versatility, capable of handling demanding tasks with ease․ Manuals for these models are readily available online, ensuring users can maintain and optimize their machines effectively․
12․2 Capabilities and Features
Kenmore heavy-duty sewing machines offer advanced capabilities, including multiple stitch options, automatic threading, and free-motion quilting․ They feature robust metal frames, high-speed stitching, and compatibility with various presser feet․ These machines are designed to handle thick fabrics like denim and leather effortlessly․ Manuals highlight these features, ensuring users can fully utilize their machine’s potential for both basic and complex sewing projects, enhancing overall sewing efficiency and creativity․
Antique and Vintage Shops
Antique and vintage shops are great sources for finding vintage Kenmore sewing machines․ They often provide free manuals or direct you to online resources for downloads, ensuring you can operate and maintain your machine effectively․
13․1 Finding Machines in Local Shops
Local antique and vintage shops are excellent places to discover Kenmore sewing machines․ Many stores specialize in refurbished models, offering a chance to inspect machines before purchase․ Some shops provide free manuals or direct you to online resources for downloads․ Thrift stores and estate sales are also great spots to find vintage Kenmore machines․ Visiting these shops allows you to see the machine’s condition firsthand and negotiate prices․ Additionally, local shops often have unique, well-maintained models like the 158․13413, making them a treasure trove for sewing enthusiasts․ Buying secondhand supports sustainability and preserves the history of these durable machines, while also offering a cost-effective way to acquire a reliable sewing machine for your projects․
13․2 Buying and Restoring Vintage Machines
Buying and restoring vintage Kenmore sewing machines can be a rewarding hobby․ Inspect the machine’s condition, checking for functional parts like the bobbin and presser foot․ Test it with fabric to ensure it sews smoothly․ Look for original accessories or manuals, as they add value․ Restoration may involve cleaning, lubricating, or replacing worn parts․ Budget for potential repairs and research local experts for guidance․ Restoring a vintage Kenmore not only preserves its history but also ensures it remains a reliable tool for sewing projects, making it a worthwhile investment for enthusiasts and crafters alike․
Kenmore sewing machine manuals are invaluable resources for optimal machine performance, troubleshooting, and maintenance․ They empower users to unlock their machine’s full potential, ensuring longevity and creativity in sewing projects․
14․1 Final Thoughts on Kenmore Sewing Machine Manuals
Kenmore sewing machine manuals are invaluable resources for users, providing essential guidance for operation, troubleshooting, and maintenance․ They empower sewists to unlock their machine’s full potential, ensuring longevity and creativity․ Whether you’re working with vintage models like the 158․13413 or modern heavy-duty machines, these manuals offer clarity and confidence․ Accessing free downloads through official sources or communities ensures you have the tools to keep your Kenmore sewing machine in optimal condition for years to come․