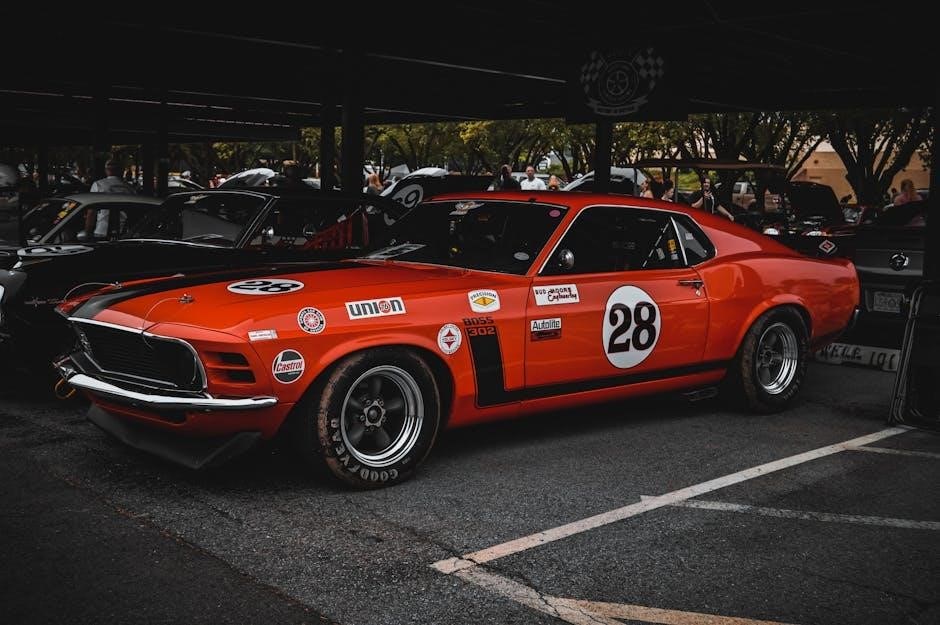
The Nissan Skyline R34 GT-R is a legendary sports car, produced from 1998 to 2002, known for its powerful RB26DETT engine and iconic 5-speed manual transmission.
1.1 Historical Significance of the R34 GT-R
The Nissan Skyline R34 GT-R holds a revered place in automotive history as a symbol of Japanese performance and innovation. Produced from 1998 to 2002, it marked the final evolution of the Skyline GT-R series before its hiatus. The R34 GT-R became legendary for its dominance in racing and its advanced all-wheel-drive system, earning it the nickname “Godzilla.” Its RB26DETT engine and 5-speed manual transmission made it a favorite among enthusiasts and tuners. The R34 GT-R also gained global fame through its appearances in media, such as the “Fast and Furious” franchise, cementing its status as a cultural icon. Today, it is highly sought after by collectors and remains a testament to Nissan’s engineering prowess.
Its historical significance is further underscored by its influence on the tuning culture and its enduring popularity in motorsports. The R34 GT-R’s legacy continues to inspire car enthusiasts worldwide, making it a timeless classic in the automotive world.
1.2 Overview of the R34 GT-R’s Features
The Nissan Skyline R34 GT-R is renowned for its powerful RB26DETT twin-turbocharged inline-6 engine, delivering exceptional performance and durability. It features a 5-speed manual transmission, which enhances driver engagement and control. The advanced all-wheel-drive system, known as ATTESA E-TS, provides superior traction and handling. The R34 GT-R also boasts a aerodynamically optimized design, with a rear wing and front splitter to improve stability at high speeds. Inside, the premium interior offers sports seats, a titanium-shift knob, and a high-quality sound system. Additional features include a turbo boost gauge and a limited-slip differential, making it a well-rounded performance vehicle. These features combined create a driving experience that balances power, precision, and luxury, solidifying the R34 GT-R’s reputation as a legendary sports car.

History and Development of the R34 GT-R
The R34 GT-R was developed by Nismo, Nissan’s motorsports division, and produced from 1998 to 2002. It introduced the iconic 5-speed manual transmission, enhancing driver engagement.
2.1 Development Process and Production Phases
The Nissan Skyline R34 GT-R was developed by Nismo, Nissan’s motorsports division, and produced from 1998 to 2002. The development focused on refining the previous R33 model, with advancements in aerodynamics, engine performance, and handling. The R34 was available in various models, including the base GT-R, GT-R V-Spec, and the limited-production Nismo versions. The production phases included gradual updates, such as the introduction of a 6-speed manual transmission in later models, enhancing driver control. The R34 GT-R was also notable for its optional manual transmission, which became a favorite among enthusiasts for its precise shifting and engagement. With a total production of around 11,000 units, the R34 GT-R remains a sought-after collectible, particularly in manual configurations.
2.2 Key Innovations in the R34 Model
The R34 GT-R introduced several groundbreaking innovations, solidifying its status as a technological marvel. Its RB26DETT engine featured a refined twin-turbo setup, delivering improved power and efficiency. The advanced ATTESA-ETS all-wheel-drive system enhanced traction and handling. Additionally, the R34 debuted Nissan’s Super HICAS rear-wheel steering system, which improved cornering stability. Aerodynamic enhancements included a more aggressive front bumper and rear diffuser, reducing drag and increasing downforce. Inside, the R34 offered a more refined interior with advanced electronics. These innovations, combined with its optional 6-speed manual transmission, made the R34 GT-R a benchmark for performance and drivability, setting it apart from its predecessors and competitors alike.

Performance and Capabilities
The R34 GT-R delivers exceptional performance with its RB26DETT engine, producing 280 horsepower and 260 lb-ft of torque. Its 6-speed manual transmission and advanced ATTESA-ETS all-wheel-drive system ensure precise control and superior acceleration, making it a driving powerhouse.
3.1 Engine Specifications and Turbocharging
The Nissan Skyline R34 GT-R is powered by the iconic RB26DETT engine, a 2.6-liter inline-6 twin-turbocharged powerhouse. This engine produces 280 horsepower at 6,800 rpm and 260 lb-ft of torque at 4,800 rpm. The RB26DETT features a robust turbocharging system with twin-scroll turbos, which reduces turbo lag and enhances mid-range power delivery. The engine is paired with a 6-speed manual transmission, allowing drivers to fully exploit the engine’s capabilities. The RB26DETT is renowned for its durability and tunability, making it a favorite among enthusiasts. Its advanced intercooler system and precision-engineered internals ensure optimal performance under various driving conditions. The R34’s engine setup is a perfect blend of power, efficiency, and reliability, solidifying its reputation as a performance icon.
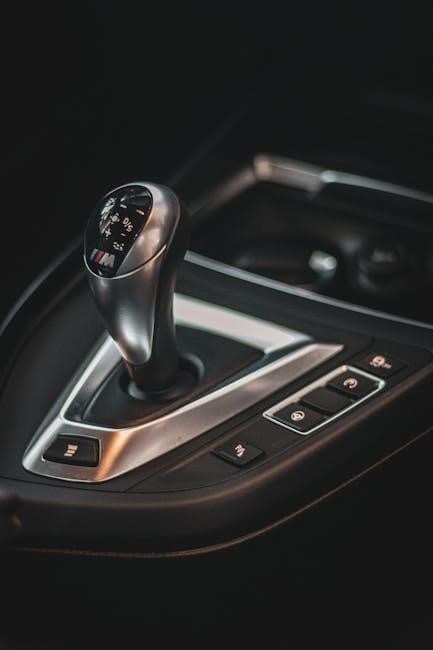
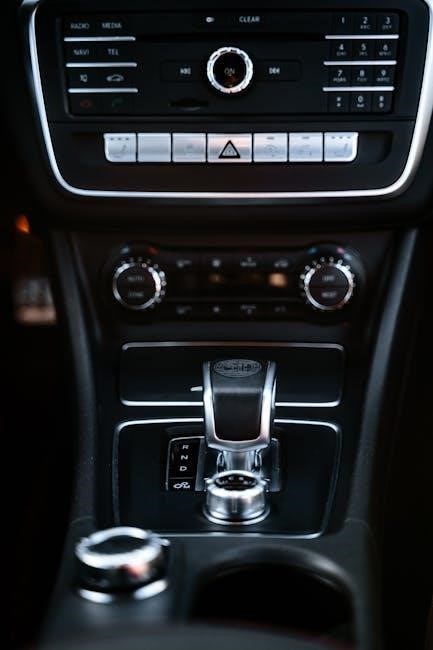
3.2 Transmission and Drivetrain
The Nissan Skyline R34 GT-R features a robust 6-speed manual transmission, designed to handle the high torque output of its RB26DETT engine. The Getrag 6-speed gearbox is known for its smooth shifting and durability, making it a favorite among enthusiasts. The drivetrain utilizes Nissan’s advanced ATTESA E-TS all-wheel-drive system, which dynamically distributes power between the front and rear wheels based on traction needs. Under normal driving conditions, the system sends 100% of the power to the rear wheels, but it can transfer up to 50% to the front wheels when slip is detected. This setup ensures exceptional handling and stability, whether on the track or the street. The rear limited-slip differential further enhances cornering precision, making the R34 GT-R a formidable performer in various driving scenarios.
3.3 Handling and Driving Dynamics
The Nissan Skyline R34 GT-R is renowned for its exceptional handling and driving dynamics, thanks to its well-balanced chassis and advanced suspension system. The multi-link rear suspension provides excellent stability and responsiveness, while the ATTESA E-TS all-wheel-drive system ensures optimal traction by dynamically distributing power between the front and rear wheels. This setup allows the car to maintain precision and control during cornering, making it a joy to drive on both twisty roads and race tracks. The rear limited-slip differential further enhances stability, particularly during high-speed maneuvers. The R34 GT-R’s aerodynamic design, including its rear wing and diffuser, generates significant downforce, improving grip at higher speeds. These features combine to create a driving experience that balances raw performance with refined control, solidifying the R34 GT-R’s reputation as a driver’s car.

Service and Maintenance Manual
The Nissan Skyline R34 GT-R Service Manual provides essential procedures and data for maintenance, ensuring optimal performance and longevity of the vehicle.
4.1 Purpose and Content of the Service Manual
The Nissan Skyline R34 GT-R Service Manual is designed to provide owners and technicians with detailed guidance for maintenance, repairs, and upgrades. It covers essential procedures for the RB series engines, including the RB25DET NEO, and offers insights into transmission swaps and wiring modifications. The manual includes specifications, diagrams, and troubleshooting tips to ensure optimal performance. Whether addressing routine maintenance or complex modifications, the guide is a comprehensive resource for enthusiasts and professionals alike, ensuring the longevity and peak performance of the R34 GT-R. Its content is tailored to both stock and modified vehicles, making it an indispensable tool for anyone working on this iconic car.
4.2 Where to Find and Download the Manual
The service manual for the Nissan Skyline R34 GT-R can be found on specialized automotive websites such as GTRusablog.com and DIYServiceManuals.com. These platforms offer free downloads of the manual, which covers maintenance procedures, engine specifications, and transmission details; Additionally, forums and communities dedicated to JDM cars often share links to downloadable PDF versions. For a more reliable source, enthusiasts can purchase a physical or digital copy from Nissan dealership websites or authorized service centers. Ensure the manual is specific to the R34 model and includes detailed diagrams and troubleshooting guides for accurate repairs and modifications.
Modifications and Tuning
The R34 GT-R offers vast tuning potential, with popular mods including engine upgrades like the RB26DETT, transmission swaps to 6-speed manual, and advanced ECU tuning for enhanced performance.
5.1 Popular Engine Modifications
Engine modifications for the R34 GT-R are highly sought after, with the RB26DETT being a favorite for tuning. Owners often upgrade turbochargers to enhance horsepower, while others opt for engine swaps to achieve higher performance. The RB26DETT engine is known for its durability and potential for significant power gains. Tuners frequently install aftermarket turbos, such as the T51R SPL, to maximize boost pressure and torque. Additionally, porting and polishing the engine, along with upgrading the intercooler, can further improve efficiency. These modifications not only enhance the car’s performance but also solidify its reputation as a legendary tuner car. The R34’s engine modifications are a testament to its versatility and enduring appeal among enthusiasts.
5.2 Transmission and Drivetrain Upgrades
Transmission and drivetrain upgrades are popular for the R34 GT-R, particularly for manual enthusiasts. Many owners opt for a 5-speed or 6-speed manual conversion to enhance driving control and performance. The Getrag 6-speed manual transmission is a common upgrade, offering smoother shifting and better durability under high horsepower. Drivetrain modifications often include upgrading the limited-slip differential and installing a stronger driveshaft to handle increased torque. These upgrades not only improve acceleration but also provide better traction during aggressive driving. For those seeking extreme performance, aftermarket clutch kits and lightweight flywheels are also popular choices. Proper installation and tuning are crucial to ensure reliability and optimal performance from these upgrades.
5.3 Electronics and ECU Tuning
Electronics and ECU tuning play a crucial role in maximizing the performance of a manual R34 GT-R. Owners often upgrade the factory ECU with aftermarket units like Ecutek or Cobb Tuning to optimize engine performance. Custom maps for fuel injection, ignition timing, and boost pressure can significantly enhance power output. Additionally, electronic upgrades such as dash cams, data loggers, and aftermarket gauges provide better monitoring and control. Tuning the ECU to work seamlessly with manual transmissions ensures smoother shifting and improved acceleration. Popular modifications also include installing piggyback ECUs for fine-tuned control over engine parameters. These electronic enhancements not only improve driving dynamics but also allow enthusiasts to tailor their R34 to their specific driving style, making it a more responsive and powerful machine on the road or track.

Buying Guide
When purchasing a manual R34 GT-R, ensure to check mileage, service history, and transmission condition. Look for original parts and avoid heavily modified cars unless verified authentic.
6.1 Tips for Purchasing an R34 GT-R
When buying a manual R34 GT-R, prioritize checking the car’s service history and mileage. Ensure the transmission is original or professionally converted, as factory manuals are rare. Inspect for any modifications that could affect performance or reliability. Look for models with the RB26DETT engine, as they are more sought after by enthusiasts. Avoid cars with excessive wear or signs of poor maintenance. Verify the authenticity of parts, especially the 6-speed manual transmission in later models. Test drive to ensure smooth gear shifting and proper clutch operation. Consider hiring a mechanic for a pre-purchase inspection to identify potential issues. Be cautious of heavily modified cars unless documentation is provided. Finally, compare prices to ensure you’re getting a fair deal for the condition and specifications of the vehicle.
6.2 Pre-Purchase Inspection Checklist
- Check the engine for any signs of wear or damage, especially the RB26DETT turbocharged unit, and verify its performance with a test drive.
- Inspect the manual transmission for proper functioning, ensuring smooth gear shifts and no leaks or unusual noises.
- Review the electronics and ECU for any error codes or malfunctions, as these can indicate underlying issues.
- Examine the exterior and interior for rust, damage, or needed repairs, paying attention to common problem areas like the trunk and wheel arches.
- Verify the authenticity of parts, especially the transmission, and ensure all modifications are documented and professionally done.
- Check the service history and maintenance records to ensure the car has been properly cared for.
6.3 Market Value Analysis
The market value of a manual R34 GT-R has seen significant appreciation, driven by its rarity and popularity among enthusiasts. Prices vary based on mileage, condition, and modifications. Stock models in excellent condition can range from $80,000 to $120,000, while highly modified versions or those with low mileage may fetch upwards of $150,000. The manual transmission is a desirable feature, often commanding a premium over automatic models. Additionally, limited production numbers and cultural significance contribute to its increasing value. As a collector car, the R34 GT-R is considered a sound investment, with values expected to continue rising due to its iconic status and ongoing demand from collectors worldwide.

Racing and Competitive Performance
The manual R34 GT-R excels in competitive racing, with its 5-speed transmission enabling precise control. It has set records, including the first manual R34 to achieve a 7-second quarter-mile.
7.1 Notable Racing Achievements
The manual R34 GT-R has made history in competitive racing, with its 5-speed transmission proving pivotal in achieving records. Notably, the R34 GT-R became the first manual transmission car to break the 8-second barrier in the quarter-mile, setting a record of 7.93 seconds. This milestone showcased the car’s potential when tuned for high performance. The RB26DETT engine, capable of producing over 2,000 horsepower with modifications, has been a cornerstone of its success. Its racing achievements have solidified the R34 GT-R’s reputation as a formidable competitor in drag racing and other motorsport events. The car’s ability to deliver exceptional power and control has made it a favorite among tuners and racing enthusiasts worldwide.
7.2 Setting Records with Manual Transmission
The manual R34 GT-R has achieved remarkable records, particularly in drag racing. One notable achievement is the world’s fastest quarter-mile time for an R34 GT-R with a manual transmission, clocking in at an impressive 7.93 seconds. This feat, accomplished by a highly modified version of the car, demonstrates the potential of the RB26DETT engine when paired with a manual gearbox. The car’s ability to deliver precise control and rapid shifting has made it a standout performer in competitive events. These records not only highlight the R34 GT-R’s performance capabilities but also its enduring popularity among racing enthusiasts and tuners who continue to push the limits of what this iconic vehicle can achieve.
Maintenance and Common Issues
Regular maintenance is crucial for the R34 GT-R’s longevity. Oil changes, filter replacements, and turbocharger inspections are essential. Common issues include worn synchros in the manual transmission and oil cooler line leaks. Addressing these promptly ensures optimal performance and prevents costly repairs. Always consult the service manual for guidance and schedule regular inspections by specialists.
8.1 Routine Maintenance Schedule
Regular maintenance is essential to ensure the longevity and performance of the R34 GT-R. The routine schedule includes oil changes every 5,000 to 7,500 miles, using synthetic oil suitable for turbocharged engines. Air and fuel filters should be replaced every 15,000 miles, while the spark plugs need attention every 30,000 miles. Inspect the manual transmission fluid every 30,000 miles and replace it every 60,000 miles. Brake fluid should be changed every 30,000 miles, and the coolant system should be serviced every 50,000 miles. Tire rotations are recommended every 5,000 miles to ensure even wear. Inspect the belts and hoses regularly, and replace them as needed. Following the service manual’s guidelines ensures optimal performance and prevents premature wear. Regular checks by a qualified mechanic can help identify potential issues early, saving time and money in the long run.
8.2 Common Problems and Solutions
The R34 GT-R, like many high-performance cars, has specific issues that owners should be aware of. One common problem is the RB26DETT engine’s oil leaks, particularly from the valve cover gasket and turbocharger seals. Regular inspections and prompt replacements can prevent costly repairs. Another issue is the manual transmission’s synchro wear, which can cause difficulty shifting gears. Upgrading to aftermarket synchro kits often resolves this. Additionally, the electrical system can be prone to glitches, such as faulty sensors or wiring harness issues. Consulting the service manual and working with experienced mechanics is recommended. Lastly, the turbochargers may require rebuilding over time, especially with high-mileage cars. Addressing these issues early ensures the car’s performance and longevity. Proper maintenance and upgrades can help mitigate these common problems effectively.

Cultural Impact
The R34 GT-R has become a cult icon, celebrated in media, racing, and tuner culture. Its manual transmission and performance have made it a global legend.
9.1 Appearance in Media and Pop Culture
The R34 GT-R has captivated audiences worldwide through its appearances in movies, video games, and TV shows. Its iconic design and performance, particularly with a manual transmission, have made it a favorite in the Fast and Furious franchise and popular racing games like Gran Turismo. The car’s legend grew as it became a symbol of Japanese tuning culture, often featured in magazines and documentaries. Its presence in media has solidified its status as a desirable and recognizable sports car, appealing to both enthusiasts and casual fans. The R34’s enduring popularity in pop culture continues to inspire new generations of car enthusiasts and modifiers.
9.2 Collector Status and Enthusiast Community
The Nissan Skyline R34 GT-R has achieved iconic collector status, particularly in its manual transmission form, due to its rarity, performance, and cultural significance. Enthusiasts worldwide covet these cars for their tunability and historical value. The R34’s popularity has grown significantly, with prices rising as collectors recognize its potential as a future classic. The enthusiast community is active, with forums, meetups, and events dedicated to preserving and modifying these vehicles. Many owners and tuners share their experiences, creating a vibrant network that celebrates the R34’s legacy. This strong community support further enhances its appeal, making it a sought-after addition to any car collection.

Future Prospects
The R34 GT-R’s future prospects are promising, with rising collector interest and potential for high-performance modifications. Manual transmission models are particularly sought after for tuning and investment.
10.1 Potential for Future Modifications
The manual R34 GT-R offers immense potential for future modifications, making it a favorite among tuners and enthusiasts. Engine upgrades, such as swapping or enhancing the RB26DETT, can significantly boost power. Transmission swaps, like installing a 6-speed manual, improve drivability and performance. Electronics and ECU tuning allow for precise control over engine parameters, enabling higher horsepower outputs. The car’s cult status ensures a thriving aftermarket, with parts readily available for suspension, brakes, and aerodynamics. Additionally, the manual transmission’s popularity in racing and street tuning guarantees continued innovation. As the R34 ages, its collector status grows, making well-modified examples highly sought after. Future mods will likely focus on balancing performance with reliability, cementing the R34’s legacy as a tunable icon.
10.2 Collectibility and Investment Value
The Nissan Skyline R34 GT-R, particularly in manual transmission form, has become a highly sought-after collector’s item. Its cultural significance, driven by appearances in media and its racing heritage, has elevated its status among automotive enthusiasts. Limited production numbers and the rarity of well-maintained models contribute to its growing value. The manual transmission variants are especially prized, as they are often associated with the car’s motorsport roots. Market trends indicate a steady increase in demand, with restored examples fetching premium prices. As the R34 ages, its collectibility is further enhanced by its nostalgic appeal and the dwindling availability of low-mileage, original-condition cars. Investors and collectors alike view the R34 GT-R as a smart investment, with its value expected to appreciate significantly in the coming years.